Avesta: Procedural Tilemap Generator
Changelog
-
v3.0.0
- Add Wave Function Collapse algorithm to create beautiful worlds.
- Bug fixes
-
v2.9.1
- Bug fix: There was a bug when setting positions on the MapArray struct.
- A bunch of code cleanup and boring stuff.
-
v2.9.0
- Add experimental render in chunks on the LevelTileGenerator for better performance on some machines.
-
v2.8.0
- New MapAdditive component to add tiles within another tilemap. For example if one has a ground tilemap and only want grass within boundaries.
-
v2.7.0
- New Preview Overlay on editor
- New map algorithms: Domain Warping, Fourier Noise, Ridged Multifractal, Voronoi and Wavelet Noise
- Performance improvements and code clean-up
-
v2.6.0
- Add support for 3D tilemaps
- Improve MapObjectPlacer algorithm
- Add RuntimeGeneration script on Demos
-
v2.5.0
- Add Jobs and Burst, making Avesta blazing fast
- Improved performance
-
v2.4.1
- Improve performance of MapLayer editor script
- Add Preview button to show the current configuration's preview
- Add checkers background to preview
-
v2.4.0
- Add preview on editor before generating a map
- Add possibility of make a layer additive, ie, mixing multiple algorithms in one
- Add Randomize button for each map layer
-
v2.3.0
- Add FractalNoise Algorithm
- Add Island Algorithm
- Add possibility to invert the tiles for some algorithms
- Improved Perlin Noise Algorithm
- Improved random config for most algorithms
- Improved Demo scene with more algorithms shown.
-
v2.1.0
- Add Destructible Tile support
-
v2.0.0
- Add Layer support! Now you can generate multiple layers using different algorithms
- Now main entry point is LevelGenerator script
- Add Basic Random Algorithm
- Add Full Grid Algorithm
- Add Path Algorithm
- Add Random Walk Algorithm
-
v1.2.0
- Code performance optimization. Now it is faster than before!
- Add important help sections under “Window/Avesta”
-
v1.1.1
- Add MapObjectPlacer to make it possible to place any object within the terrain on the Tilemap
- Code cleanup
-
v1.0
- First version of Avesta. It supports random terrain generation
Note: If you are upgrading from v1.+ please remove everything first and then install Avesta v2+
Introduction
First of all, we would like to personally thank you for trying out this asset! We hope it helps you on your game dev journey.
What is Avesta?
Avesta is an easy-to-use Procedural Tilemap Generator Tool. It contains several algorithms for you to play around. This is not a replacement for a normal Tilemap, it’s a creative tool to start designing your world!
Start using Avesta
Setup
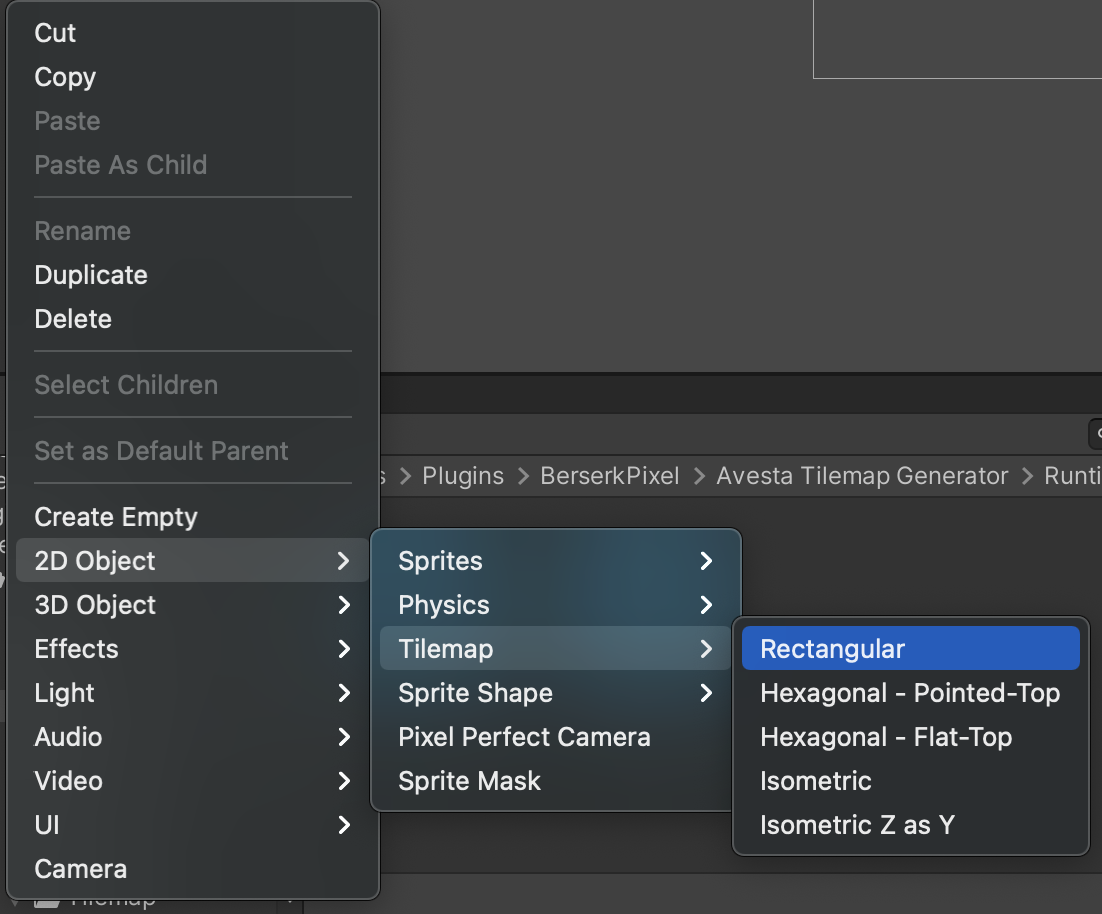
First of all, make sure you have a Rectangular Tilemap in your Scene by right clicking on your Hierarchy, 2D Object -> Tilemap -> Rectangular. This will create a GameObject with a Grid script attached to it and with a child GameObject with a Tilemap component attached.
Note: if you are making a 3D game, please see the 3D extras setup below after you finishing this setup.
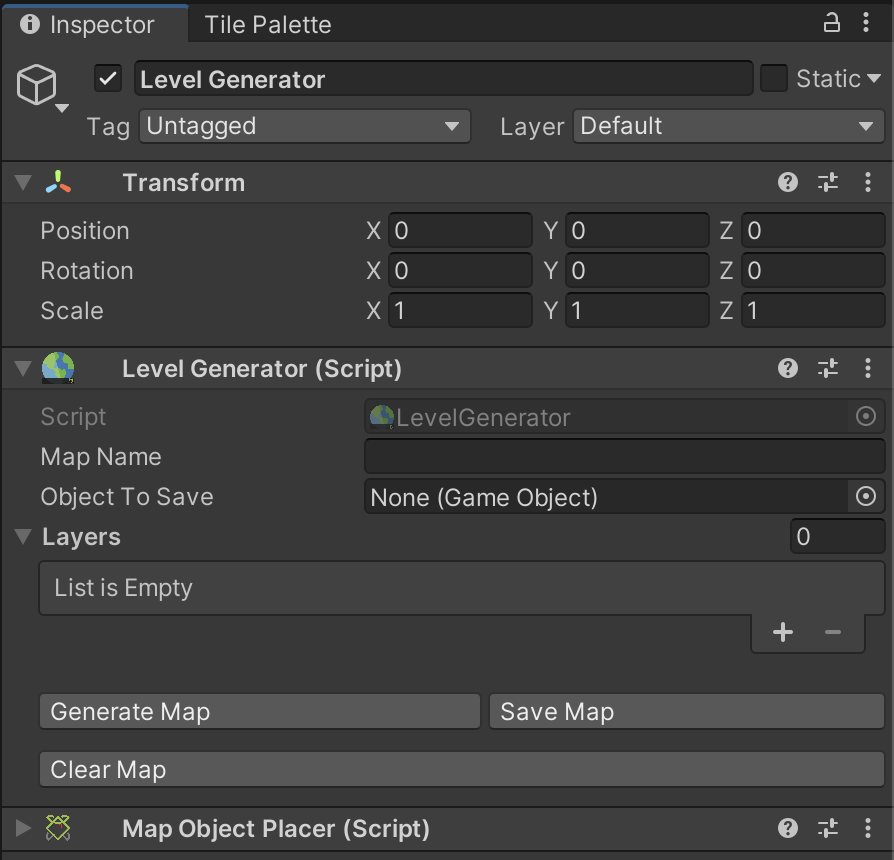
Once you have your Rectangular Tilemap in place, drag the Level Generator prefab from Runtime/Prefabs folder to your scene. Click the added prefab to see it on the Inspector.
You will notice there’s a new view inside your Scene view called “Preview Overlay”.
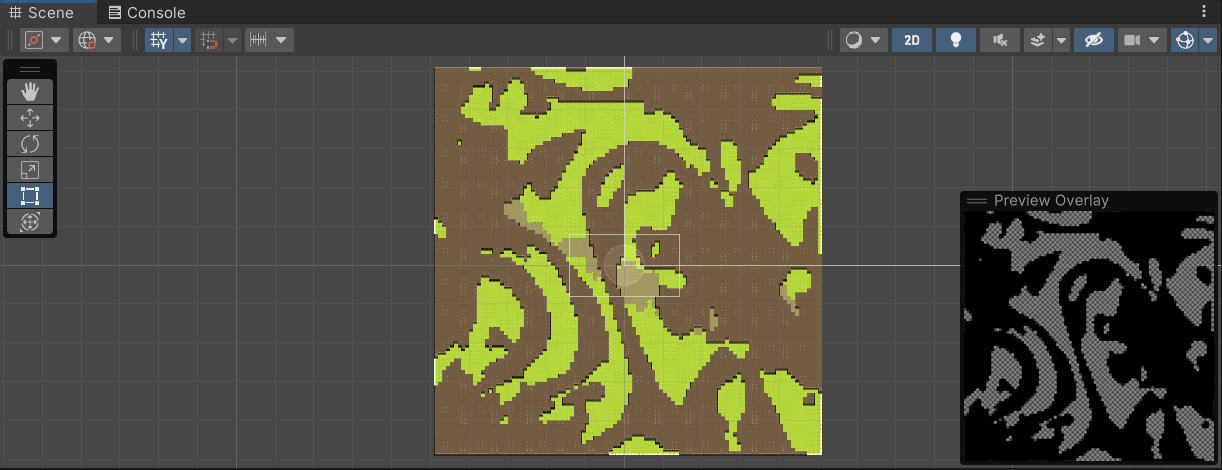
Whenever you made a change on the Level Generator in the Inspector the Preview Overlay will update automatically.
As from Avesta v2.0.0 you have support for multiple layers, each with different configurations. Now, change that “0” to the right of the “Layers” attribute to a “1”.
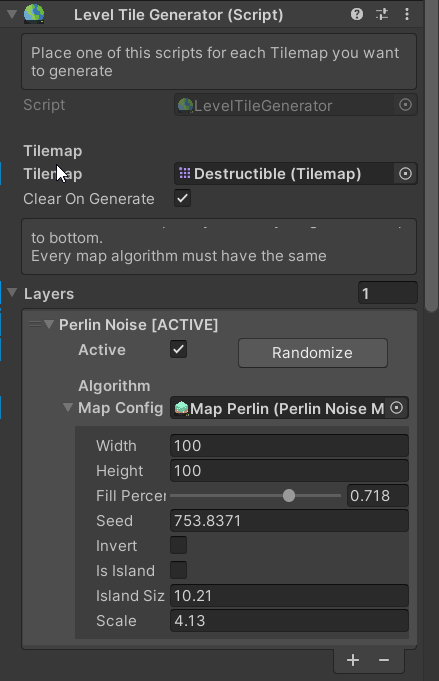
This is the first step of your journey. Drag the previously created Tilemap to the Tilemap field.
The Clear on Generate checkbox is useful to toggle in between clearing the map before generating the new one or not. If true, it will clear the map before generating new one, false otherwise.
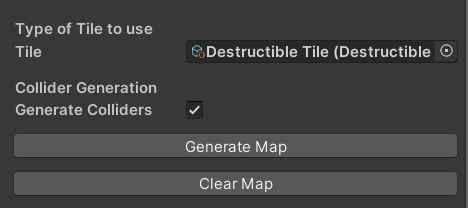
At the end of this component you will see the final fields. Choose a tile (or a Rule Tile for example) and put it into the Type of Tile field.
The Generate Colliders checkbox is also there if you want to choose to generate or not colliders to this tilemap when generating a map.
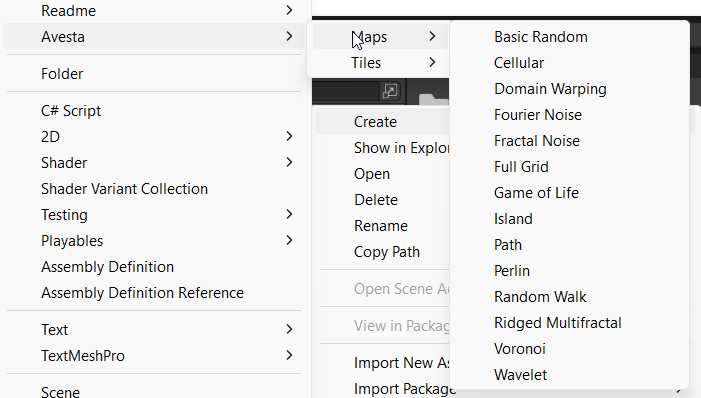
Next you need a MapConfiguration file. In any folder you want, right click then:
Create → Avesta → Maps → Choose any of this algorithms.
After that you should see a new file created. You can edit this file or even better, just drag it into the LevelGenerator’s layer Map Config field under the Algorithm header
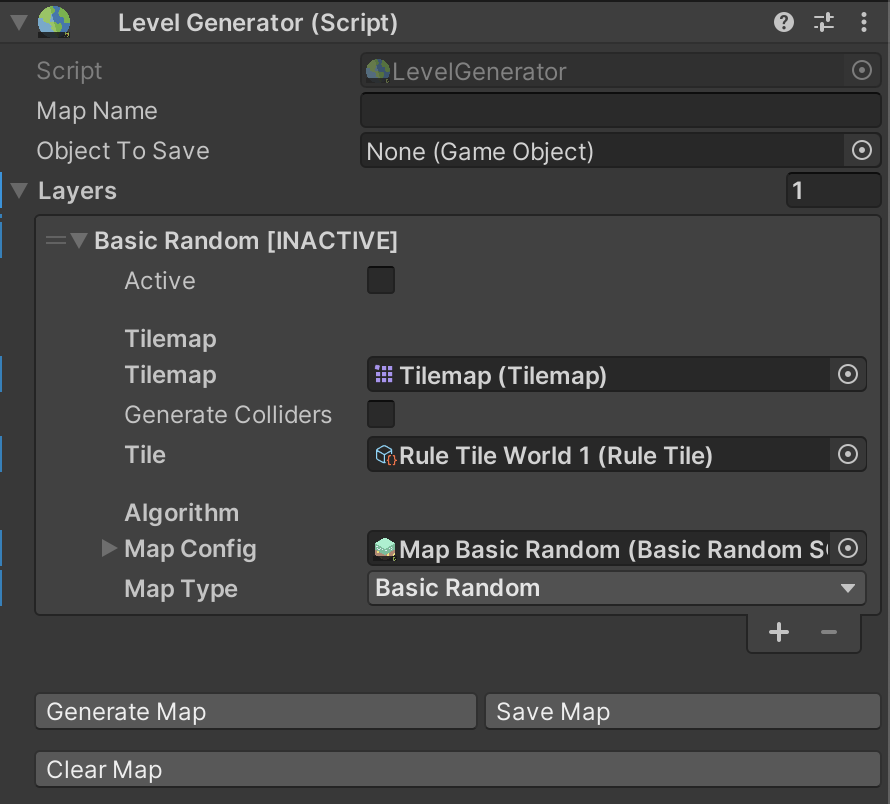
As you can see, the name for this Layer has changed matching the algorithm’s name as well! Also you can see on the picture above that this layer is Inactive by default. Let’s change that but clicking the “Active” property under the title:
This will enable the preview for that layer.
You will notice that there’s also a field called “Is Additive”. This is used to “add” or mix multiple layer algorithms into the generated map. By using this on the same tilemap you can generate really unique maps.
There’s also a “Randomize” button on the top right corner of each layer. This helps to randomize that specific layer. Each algorithm changes some of their parameters when clicked.
This again will change the title to display the status of this layer. This is useful whenever one is playing around with different algorithms and layers to create the best possible map.
Also, the “Generate Colliders” field helps us creating standard collision detection for the given Tilemap. This is super useful if you have a Walls map layer for example.
From here you can edit all the configurations for that specific algorithm.
Change some parameters such as the width and height and then press the “Generate Map“ button below!
The “Clear Map” button just resets all Tilemaps on the active layers, clearing all the tiles on them. This will not reset any configuration made on that layer, just the visuals and the collisions if the “Generate Colliders” is enabled.
Finally you can drag and drop your character inside the map and play around. We provide 2 sample scripts for a simple player movement and a camera follow so you can test around your newly created map!
Making a 3D Tilemap
If you follow along but wanted to make a 3D scene, you will notice it looks strange. You will need to make some adjustments.
- Delete the Level Generator prefab from the Hierarchy view
- Drag & Drop the Level Object Generator prefab (under Avesta/Runtime/Prefabs)
After that you will need to adjust the tilemap itself. Click on the Grid GameObject and change the Cell Swizzle to XZY.
After that you will need to change every child inside the Grid gameobject that has a Tilemap component attached. On this component, change Orientation to XZ.
That’s it! now you can use the Level Object Generator as usual.
If you want to simulate height, you can make multiple Tilemaps and change their Y position on the transform accordingly.
Placing Objects
We imagined that you would like to place objects on your Tilemap and this has never been as simple as with Avesta!
Attach the MapObjectPlacer script to your Level Generator game object (or any other you want).

Drag the target Tilemap where you want the objects to be placed. If you have any other Tilemap that is used as water or walls and you want to avoid those ones when placing objects, just drag them into the “Obstacles Tilemaps” field.
Change the Objects size to match how many different type of prefabs you would like to place. Drag your objects on the fields and play around with the weight. The bigger the weight, the more chances it has to appear. Adjust your Object Fill Percent for the total amount of objects to place and finally press the Place Objects button.
The “Clear Objects” button just removes all the objects you placed on that given Target Tilemap field.
Smart Map Generation
Setup
- In your scene you need to have a Tilemap
- Create a new GameObject and add the WfcComponent script to it.
-
A new set of buttons will appear in your SceneView:

- Use the tilemap normally with the Tile Palette. Try to paint all possible connections, but don’t worry, you can add more later.
- Once you are happy with the results, select the WfcComponent gameobject to open again the Avesta panel.
-
Select “Sync Tile Set”. The button will turn green

-
Now using the mouse drag your tilemap area to copy the tiles into
Avesta

- A new popup window will appear to ask where to save the tiles. Select a folder.
- Now you can make changes to the tilemap again using the Tile Palette if you want to add more tiles.
- Finally you can select the “Paint Over” mode and start dragging wherever you want to smart paint.
- Also you can click “Regenerate” in case you want another configuration of tiles.
Generate Map Mode
This mode allows you to use a “clean slate” of tiles. It will override everything in the tilemap.
Paint Over Mode
This mode was made as a paint tool. You can select the area and it will only paint on that area.
Troubleshooting
- You can always do Ctrl+Z to undo.
- Whenever you select a Mode, the button will turn green. To reset the selection just deactivate and activate again the selected Mode.
- Since we are painting in a Tilemap, the bigger the area, the slower it can be so painting in chunks is adviced.
Supported Algorithms Configurations
All configurations have Width and Height fields that needs to match to whatever dimensions you would like this layer to have.
Basic Random
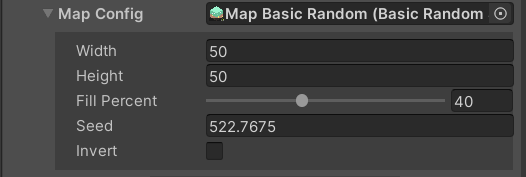
- Fill Percent [float range (0-100)]: how much do you want to “paint” the tilemap. The higher the number the more tiles will it have.
- Seed [string]: just a random seed for the generator. You can use text or numbers here.
- Invert [bool]: inverts the current configuration. What used to be terrain, now it’s not and viceversa.
Cellular Automata
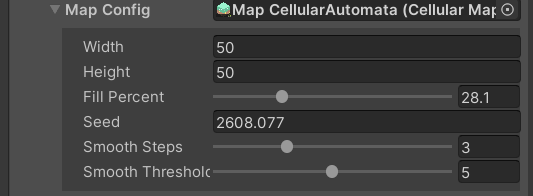
- Fill Percent [float range (0-100)]: how much do you want to “paint” the tilemap. The higher the number the more tiles will it have.
- Seed [string]: just a random seed for the generator. You can use text or numbers here.
- Smooth Steps [int range(0-10)]: How much to smooth the generated map.
- Smooth Threshold [int range(0-10)]: The threshold the smooth step will have.
Full Grid
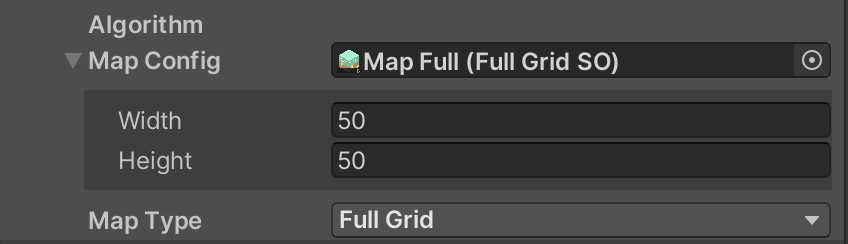
Basic configuration. It will fill the entire tilemap with the desired dimensions.
Game Of Life
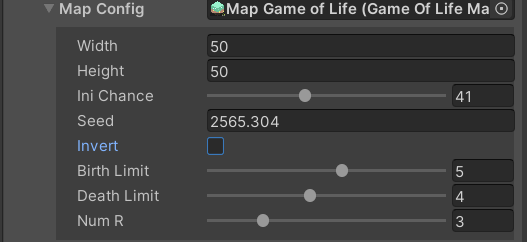
- Ini Chance [int range(0-100)]: The initial chance for the algorithm.
- Seed [string]: just a random seed for the generator. You can use text or numbers here.
- Invert [bool]: inverts the current configuration. What used to be terrain, now it’s not and viceversa.
- Birth Limit [int range(1-8)]: Limits the number of iterations.
- Death Limit [int range(1-8)]: Limits the amount of deaths.
- Num R [int range(1-10)]: Total number of runs/iterations.
If you want to know more about this algorithm here is a good resource
Path
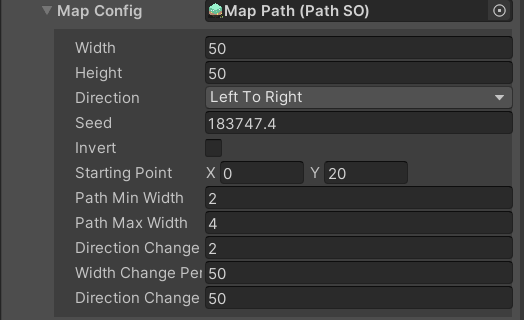
- Direction [TopToBottom, BottomToTop, LeftToRight, RightToLeft]: The direction where the path should move.
- Seed [string]: just a random seed for the generator. You can use text or numbers here.
- Invert [bool]: useful if you are trying to achieve either a cave or an island/walking path look.
- Starting Point [Vector2Int]: where should the path start.
- Path Min Width [int]: the minimum units the path can have.
- Path Max Width [int]: the maximum units the path can have.
- Direction Change Distance [int]: the amount in units the direction can change.
- Width Change Percentage [int]: a percentage for changing the width.
- Direction Change Percentage [int]: a percentage for changing the direction.
Perlin Noise
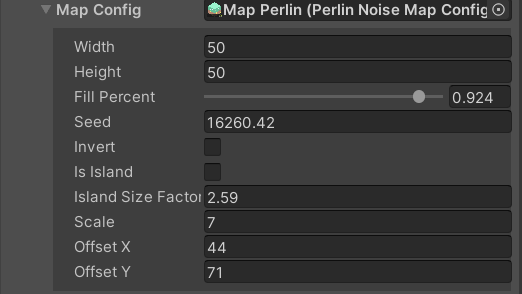
- Fill Percent [float range(0-1)]: how much do you want to “paint” the tilemap. The higher the number the more tiles will it have.
- Seed [string]: just a random seed for the generator. You can use text or numbers here.
- Invert [bool]: inverts the current configuration. What used to be terrain, now it’s not and viceversa.
- Is Island [bool]: if enabled it will create an island-type-of-map (no walls)
- Island Size Factor [float]: how big the island should be. Play with negative numbers as well to see some cool results.
- Scale [float]: the whole scale of the map. It’s kind of the “zoom” factor the map will have.
- Offset X [float]: the offset on the X axis.
- Offset Y [float]: the offset on the Y axis.
Random Walk
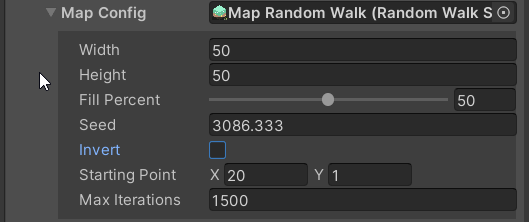
- Fill Percent [float range (0-100)]: how much do you want to “paint” the tilemap. The higher the number the more tiles will it have.
- Seed [string]: just a random seed for the generator. You can use text or numbers here.
- Invert [bool]: inverts the current configuration. What used to be terrain, now it’s not and viceversa.
- Starting Point [Vector2Int]: where should the map start.
- Max Iterations [int]: how many iterations should be done for the final map. 1000-1500 iterations have been prove to be a nice result on our tests but of course it’s up to you.
Fractal Noise
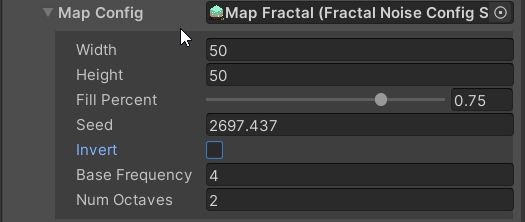
- Fill Percent [float range (0-1)]: how much do you want to “paint” the tilemap. The higher the number the more tiles will it have.
- Seed [string]: just a random seed for the generator. You can use text or numbers here.
- Invert [bool]: inverts the current configuration. What used to be terrain, now it’s not and viceversa.
- Base Frequency [float]: The base frequency of the noise.
- Num Octaves [int]: The number of octaves to use in the noise.
Island
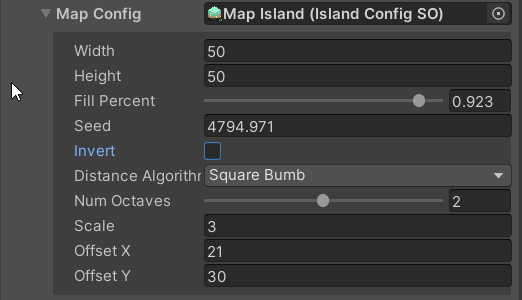
- Fill Percent [float range (0-1)]: how much do you want to “paint” the tilemap. The higher the number the more tiles will it have.
- Seed [string]: just a random seed for the generator. You can use text or numbers here.
- Invert [bool]: inverts the current configuration. What used to be terrain, now it’s not and viceversa.
- Distance Algorithm [None, Basic, Eucledian, Square Bumb]: different algorithms to calculate the distance for this algorithm. Generate slightly different results.
- Num Octaves [int range(1-3)]: The number of octaves to use in the noise.
- Scale [float]: the whole scale of the map. It’s kind of the “zoom” factor the map will have.
- Offset X [float]: the offset on the X axis.
- Offset Y [float]: the offset on the Y axis.
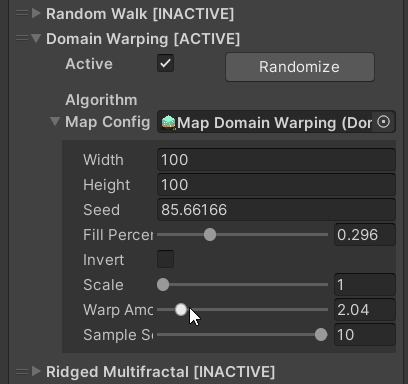
Domain Warping
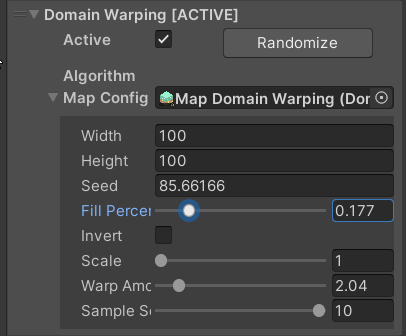
- Fill Percent [float range (0-1)]: how much do you want to “paint” the tilemap. The higher the number the more tiles will it have.
- Seed [string]: just a random seed for the generator. You can use text or numbers here.
- Invert [bool]: inverts the current configuration. What used to be terrain, now it’s not and viceversa.
- Scale [float range (1-10)]: the whole scale of the map. It’s kind of the “zoom” factor the map will have. The lower, the bigger
- Warp Amount [float range(1-10)]: the amount of warping or distortion to use.
- Sample Scale [float range (1-10)]: the amount of samples to use in the algorithm. The more samples, the more “detailed” the map will be.
Fourier Noise
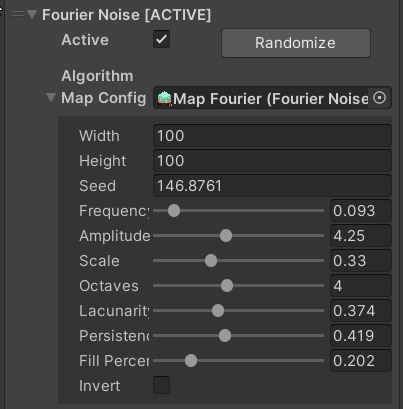
- Fill Percent [float range (0-1)]: how much do you want to “paint” the tilemap. The higher the number the more tiles will it have.
- Seed [string]: just a random seed for the generator. You can use text or numbers here.
- Invert [bool]: inverts the current configuration. What used to be terrain, now it’s not and viceversa.
- Frequency [float range (0-1)]: adjusts the strength of the noise.
- Amplitude [float range (0-10)]: also helps controlling the strength of the noise.
- Scale [float range (0-1)]: controls the overall size of the noise feature.
- Octaves [int range(1-8)]: the number of noise layers added together.
- Lacunarity [float range (0-1)]: the increase in frequency between successive noise layers.
- Persistence [float range (0-1)]: the decrease in amplitude between successive noise layers.
Ridged Multifractal
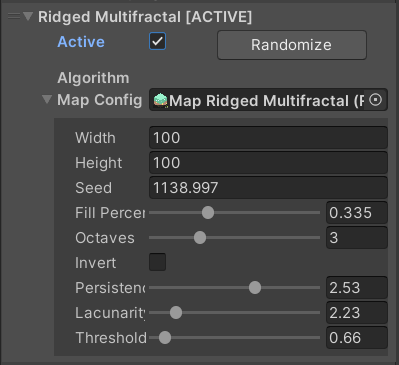
- Fill Percent [float range (0-1)]: how much do you want to “paint” the tilemap. The higher the number the more tiles will it have.
- Seed [string]: just a random seed for the generator. You can use text or numbers here.
- Invert [bool]: inverts the current configuration. What used to be terrain, now it’s not and viceversa.
- Octaves [int range(1-8)]: the number of noise layers added together.
- Lacunarity [float range (1-10)]: the increase in frequency between successive noise layers.
- Persistence [float range (0-4)]: the decrease in amplitude between successive noise layers.
- Threshold[float range (0-10)]: works similar that fill percent but allows better control on how we display this map. The bigger the number, the more pixels we discard when drawing.
Voronoi
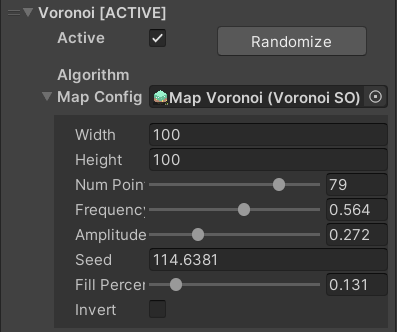
- Fill Percent [float range (0-1)]: how much do you want to “paint” the tilemap. The higher the number the more tiles will it have.
- Seed [string]: just a random seed for the generator. You can use text or numbers here.
- Invert [bool]: inverts the current configuration. What used to be terrain, now it’s not and viceversa.
- Number of Points [int range (1-100)]: number of initial points to take in consideration.
- Frequency [float range (0-1)]: controls how frequent a pixel can be. The bigger the more possibility to have land there.
- Amplitude [float range (0-1)]: also helps controlling the strength of the noise.
Wavelet Noise
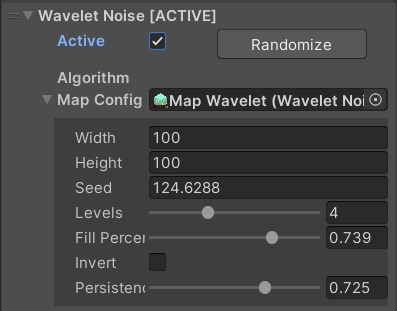
- Fill Percent [float range (0-1)]: how much do you want to “paint” the tilemap. The higher the number the more tiles will it have.
- Seed [string]: just a random seed for the generator. You can use text or numbers here.
- Invert [bool]: inverts the current configuration. What used to be terrain, now it’s not and viceversa.
- Levels [int (range 1-10)]: the number of noise layers added together.
- Persistence [float range (0.1-1)]: the decrease in amplitude between successive noise layers.
Destructible Tilemaps
Welcome to the world of destruction! Creating 2D destructible maps has never been easier.
Destructible Tile
The first step is to create a Destructible Tile. For this right click on your Project window go to Create → Avesta → Tiles → Destructible Tile

This will create a new asset
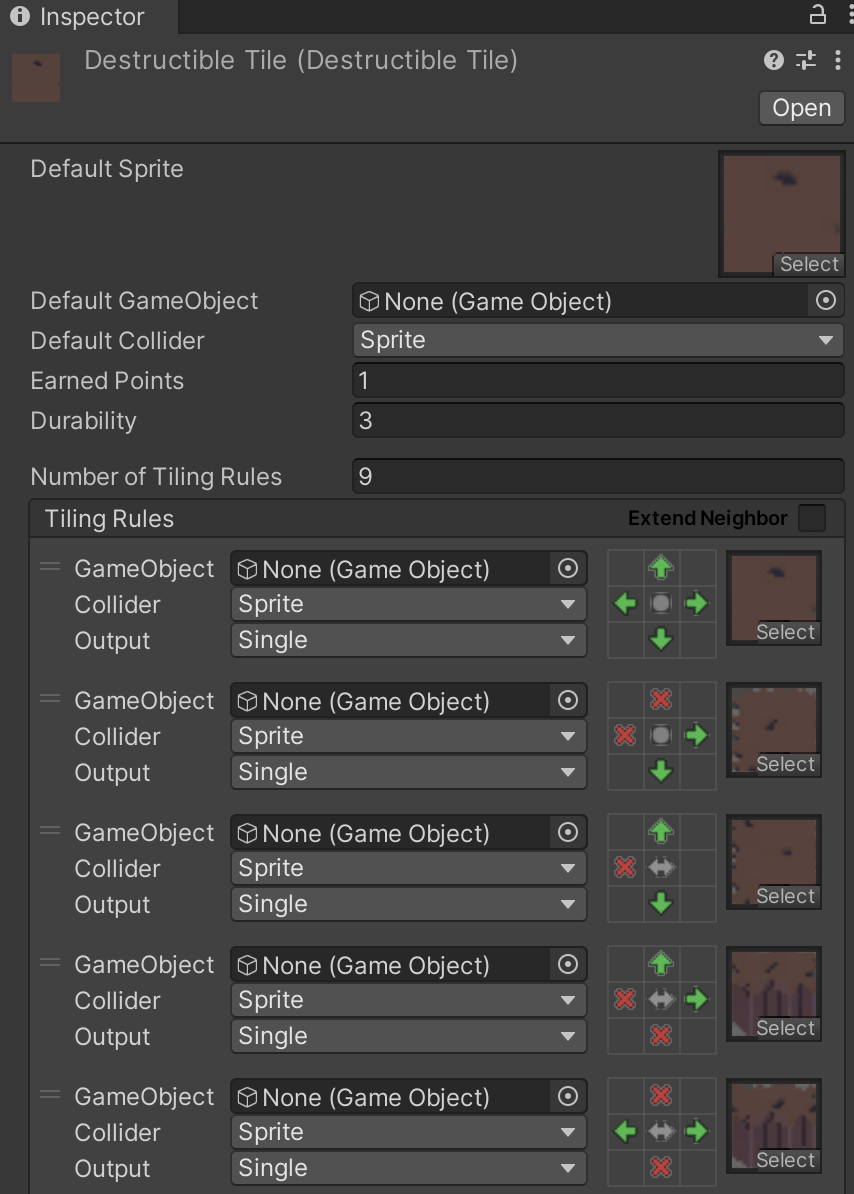
Destructible Tile inherits from the Rule Tile. It has the same functionality but it adds some fields
- Earned Points: just an integer to be returned when a tile is destroyed. This is useful if you want to earn “gold”, “coins”, “experience points” or anything of that sort to unlock new features on your game.
- Durability: in simple words, it’s the “health” of each tile. The amount of hits it can handle.
The rest is just as any other Rule Tile you had done before.
Destructible Tilemap
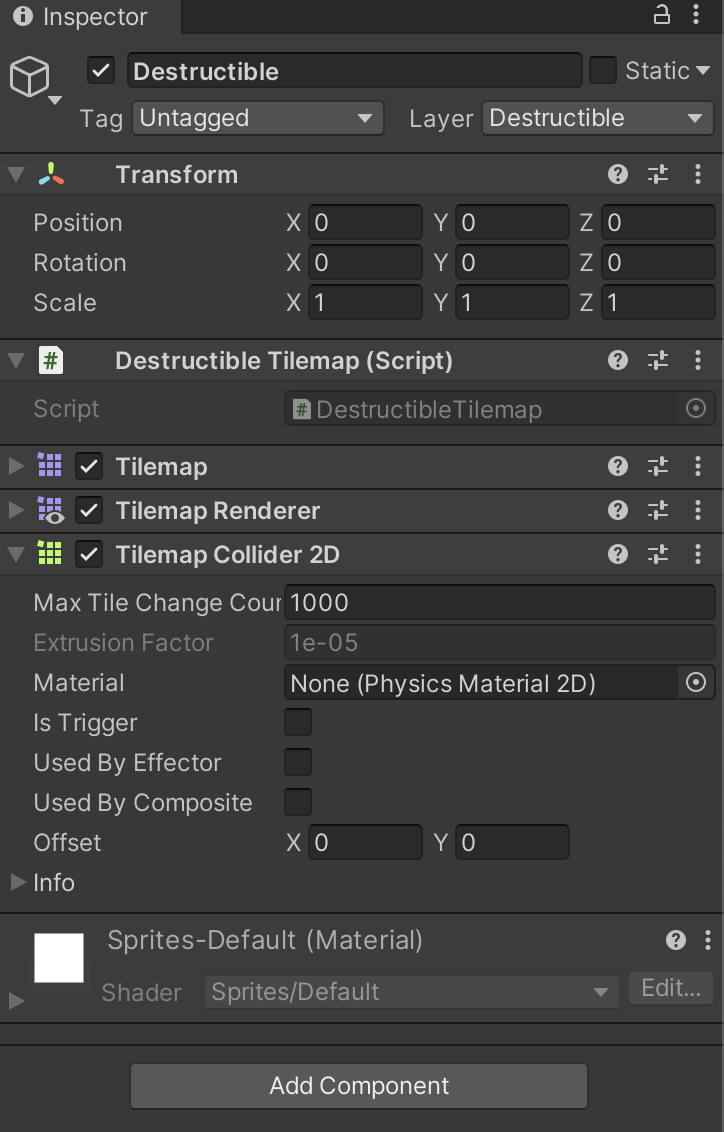
For a normal Tilemap to have Destructible capabilities, just add the Destructible Tilemap script to it. Also you can create/change the Layer of this object so it makes it easier afterwards to interact with it.

Note 1: Since you adjust the Layer of this tilemap, be sure to update accross the scene (Culling masks on the Camera game object, etc)
Note 2: at this point you can also add a TilemapShadow to this Tilemap. Be aware about the Order In Layer. Adjust it accordingly so it looks good.
Once the script is added you can use it normally in your Level Generator script as any other Tilemap. Drag it and also drag the previously created Destructible Tile.
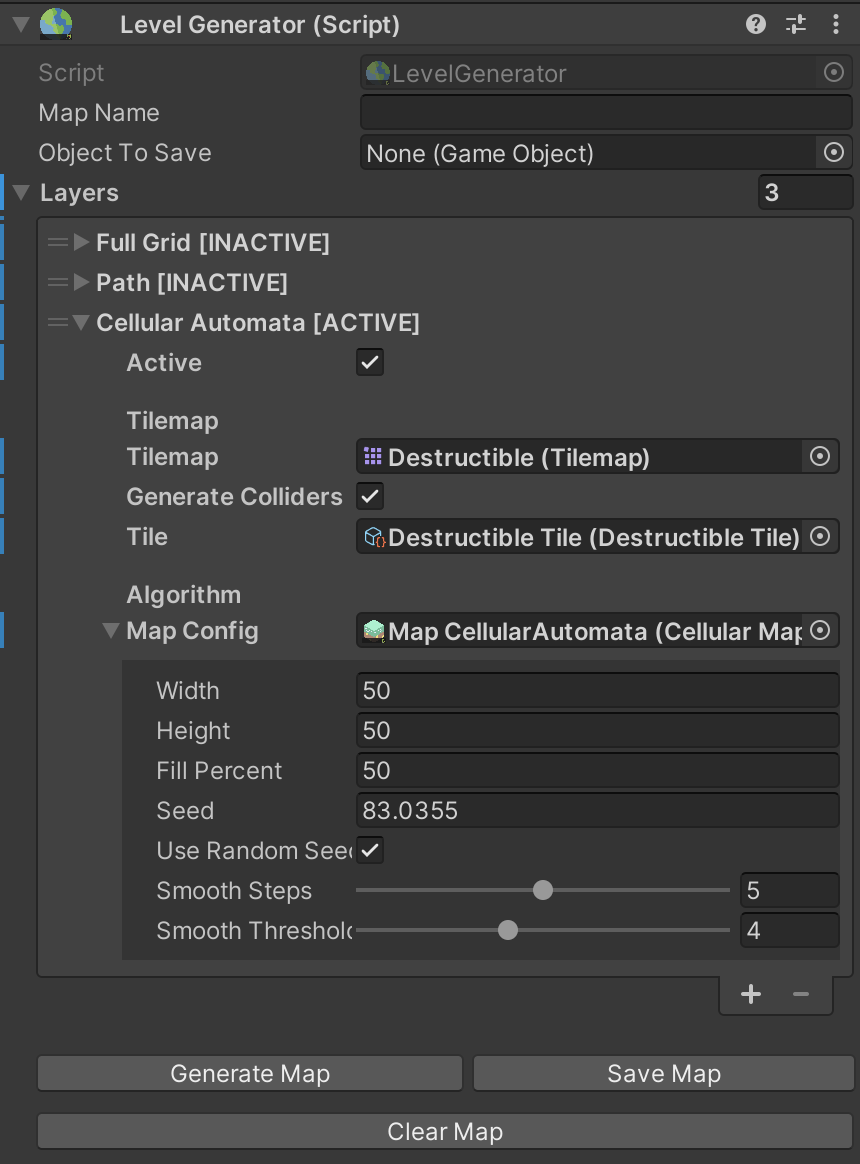
Notice that we are generating the colliders. This way we can detect the collisions and destroy the tiles accordingly.

In the demo scene we are using a Geometry Type of Outlines since it’s more performant but Polygons works as well.
When doing research on this matter, using a CompositeCollider2D is way more performant since it wraps every tile’s colliders into one. The drawback is that the detection of the collisions is better on the edges of your tilemap. For some projects this is fine but if you need a better “per-tile” approach you can remove the CompositeCollider2D and the Rigidbody2D and uncheck the “use by composite” on the main TilemapCollider2D (you can see this on the Bomberman Destructible demo Scene.
You can also add a “destroyed tile” status when a tile is destroyed (a simple visual like a ground tile). To do this, create a new Tilemap object on your hierarchy. Add the Destructible Tilemap Background script to it and drag the destructed tile and tilemap to follow. Afterwards just click on the “Update Background” button. This will copy the reference Tilemap and add the visual tile.
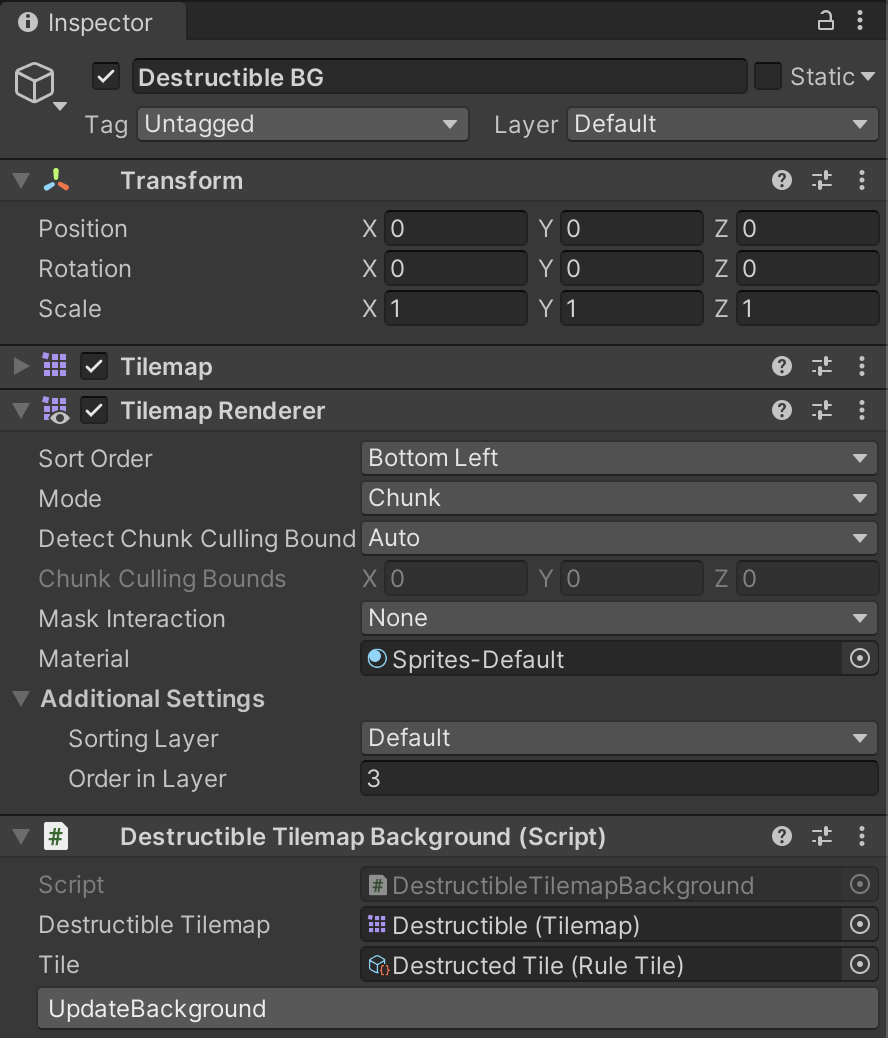
Note: this tilemap should be rendered below the main Destructible Tilemap. Just change the Order In Layer to do this.
If you have any doubts, you can see this in work in the Destructible Scene.
Destroying Tiles
Too much blah blah until now, let me destroy things!
To destroy tiles we need a new script. This one could be attached to the player or anything you want. On this script you just need to have a point in the world and send it to the destructible tilemap.
In this example we will see how we can destroy a tile when the mouse is clicked.
public class ClickAndDestroy : MonoBehaviour
{
		// the Layer of the Destructible Tilemap
    [SerializeField] private LayerMask targetMask;
		// how big we need to check
    [SerializeField] private float checkRadius = .4f;
    // Depending on the type of game you could have different tools/weapons with different amount of damages
    [SerializeField] private int tileDamage = 3;

    [Header("FX")]
		// show a visual on the grid
    [SerializeField] private Transform tileVisuals;
    [SerializeField] private ParticleSystem destroyParticles;

    private Camera _mainCamera;
    private Vector2 _mousePosition;

    private void Awake()
    {
        _mainCamera = Camera.main;
    }

    private void Update()
    {
				// get the moouse position
        _mousePosition = _mainCamera.ScreenToWorldPoint(Input.mousePosition);
				// check if collides with something using the LayerMask
        Collider2D overlapCircle = Physics2D.OverlapCircle(_mousePosition, checkRadius, targetMask);

        DestructibleTilemap destructibleTilemap = null;

				// display a visual if it hits the target mask
        if (overlapCircle != null && overlapCircle.TryGetComponent(out destructibleTilemap))
        {
            if (!tileVisuals.gameObject.activeSelf)
            {
                tileVisuals.gameObject.SetActive(true);
            }

            tileVisuals.position = destructibleTilemap.GetTileCenter(_mousePosition);
        }
        else
        {
            tileVisuals.gameObject.SetActive(false);
        }

        if (!Input.GetMouseButton(0) || overlapCircle == null || destructibleTilemap == null) return;

        // if we clicked on a proper destructible tile we perform the visuals and destroy the tile

        destroyParticles.transform.position = _mousePosition;
        destroyParticles.Play();
        // here we send the hit position where we clicked and the amount of damage to that tile.
        // depending on the type of game you could have different tools/weapons with different
        // amount of damages.
        destructibleTilemap.PerformContact(_mousePosition, tileDamage);
    }

    private void OnDrawGizmos()
    {
        Gizmos.color = Color.red;
        Gizmos.DrawWireSphere(_mousePosition, checkRadius);
    }
}
Extras
On the Samples folder you will find 3 different Scenes: Demo Scene, Occlusion Scene and Destructible Scene.
Demo Scene
This is a basic scene where you can play around with the LevelGenerator settings. Some things to notice are the Order in Layer for the different Tilemaps under the Additional Settings on the Tilemap Renderer.
For example, in a normal settings you would have
| Layer | Order In Layer |
|---|---|
| Ground | 0 |
| Paths/Decorations | 1 |
| Wall Shadows | 2 |
| Walls | 3 |
In the Demo, we provide a TilemapShadow script with a simple “shadow material” (just a normal gray color with alpha)

This script copies a tilemap and also offsets it downwards (0.25f down) of the reference tilemap.
Occlusion Demo Scene
This scene has the same functionality as the previous one but it adds a simple way of making it more performant but hiding and showing the tilemaps to the player while it moves.
The player has a OcclusionCullingDetector script on one of the child game objects. This one helps detecting a tilemap and activate it.
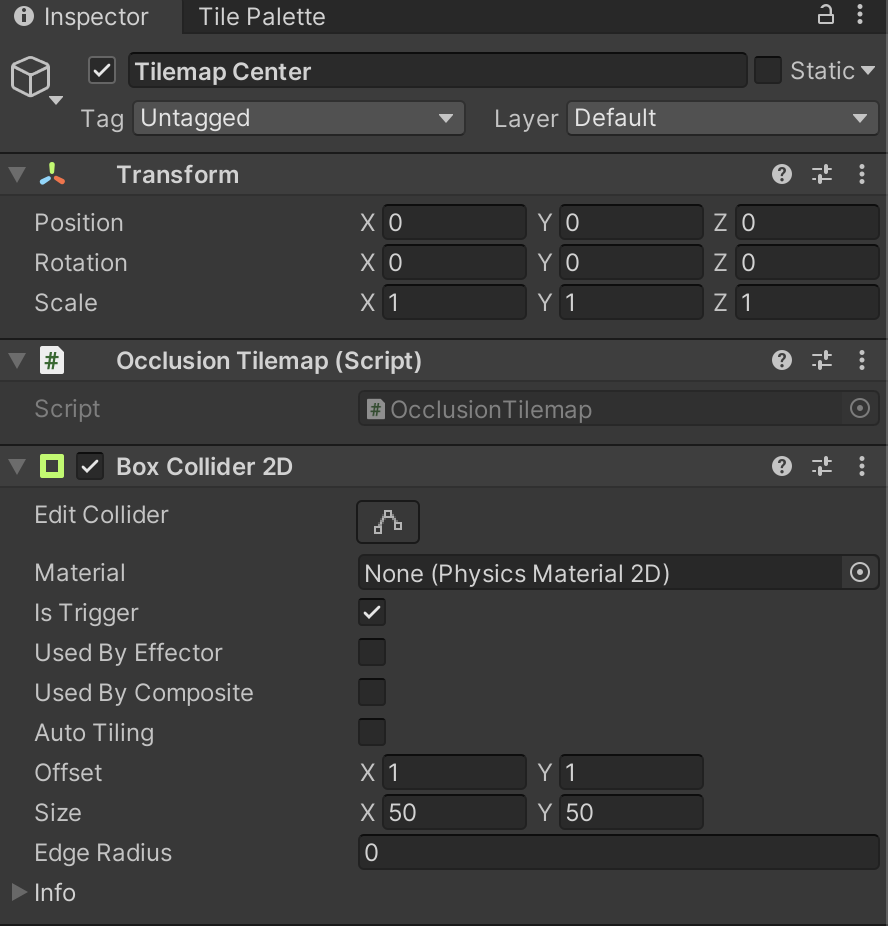
Another thing to note is that each Chunk container has an Occlusion Tilemap and a Trigger Collider components attached to them. This helps the OcclusionCullingDetector script detect them.
Bomberman Demo Scene
This scene shows how easy is to create a Bomberman-like game with the Destructible Tiles. Play around with the ship and place bombs using the Spacebar on your keyboard.
Wrapping up!
Now you are set to start your own game! Play around with the settings in the inspector and come up with great worlds!
The possibilities of expansion are endless! Just use the Tilemap as usual afterwards to place different objects and tiles to tweak your world as it fits better.
Thanks again for trying Avesta! If you are curious about what else we have, check more of our content in our Shop on the Asset Store!
For any further question not covered here feel free to contact us at support@berserkpixel.studio
F.A.Q
Help! I can’t see the Rule tiles properly. It shows Missing (Mono Script)

This is because in order to use Rule Tiles, one has to install the 2D-Extras preview package. For safety reason we are not allowed to include a preview package into our assets. But it’s a super quick fix!
Solution 1
The following line needs to be added to your Packages/manifest.json file in your Unity Project under the dependencies section:
"com.unity.2d.tilemap.extras": "https://github.com/Unity-Technologies/2d-extras.git#master"For more information please check out the official Github Repo: https://github.com/Unity-Technologies/2d-extras
Solution 2
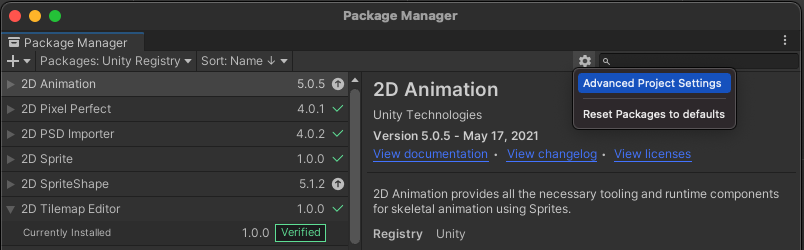
Another way of adding it is going to you Package Manager window (Window → Package Manager), click on the gear icon and select Advanced Project Settings.
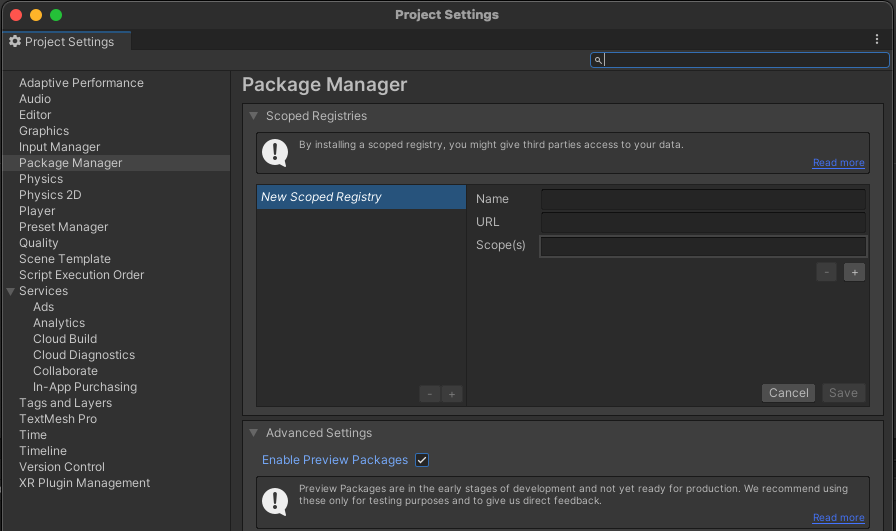
Afterwards just enable preview packages
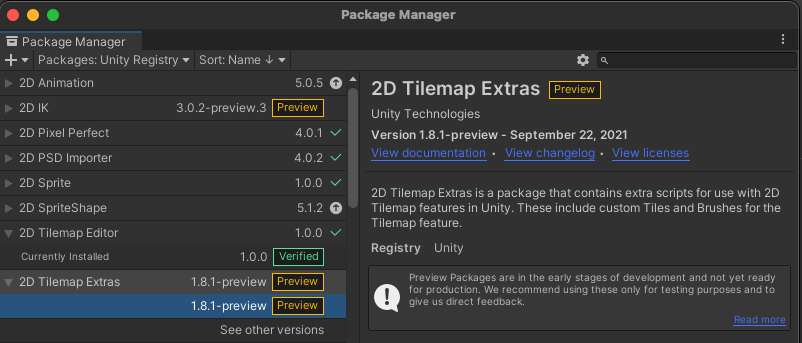
And then the 2D Tilemap Extras should appear in your Package Manager
Library\PackageCache\com.unity.2d.tilemap.extras@2.2.5\Runtime\Tiles\AnimatedTile\AnimatedTile.cs(171,26): error CS1061: 'ReorderableList' does not contain a definition for 'IsSelected' and no accessible extension method 'IsSelected' accepting a first argument of type 'ReorderableList' could be found (are you missing a using directive or an assembly reference?)
Solution
The following line needs to be modified on your Packages/manifest.json file in your Unity Project under the dependencies section:
"com.unity.2d.tilemap.extras": "2.2.5",

to

"com.unity.2d.tilemap.extras": "X.Y.Z",
where “X.Y.Z” is the version corresponding to your Unity version. Here you can find all the available version on the toggle group on the top left.
For more information please check out the official Github Repo: https://github.com/Unity-Technologies/2d-extras